
Battle of Byram's Ford facts for kids
Quick facts for kids Battle of Byram's Ford |
|||||||
|---|---|---|---|---|---|---|---|
| Part of Price's Raid during the American Civil War |
|||||||
 Modern view of Byram's Ford |
|||||||
|
|||||||
| Belligerents | |||||||
| Commanders and leaders | |||||||
| James G. Blunt (October 22) Alfred Pleasonton (October 23) |
Joseph O. Shelby (October 22) John S. Marmaduke (October 23) |
||||||
| Units involved | |||||||
| Blunt's division (October 22) Pleasanton's division (October 23) |
Shelby's division (October 22) Marmaduke's division (October 23) |
||||||
The Battle of Byram's Ford was a key fight during Price's Raid in the American Civil War. It happened on October 22 and 23, 1864, in Missouri. This battle is also known as the Battle of Big Blue River or the Battle of the Blue.
In late 1864, the Confederate army was struggling. Sterling Price, a Confederate Major General, led an invasion into Missouri. His goal was to capture cities like St. Louis and Jefferson City. But Union forces stopped him. Price then turned his army west towards Kansas City.
On October 22, Price's army was caught between two Union forces. These forces were led by Major Generals James G. Blunt and Alfred Pleasonton. Part of Price's army fought a delaying action against Pleasonton. This was at the Second Battle of Independence. Meanwhile, Confederate Brigadier General Joseph O. Shelby's troops broke through Blunt's lines. They crossed the Big Blue River at an unguarded ford. The Union defenders had to retreat to the Kansas state line. The 2nd Kansas State Militia Infantry Regiment was trapped and defeated at the Mockbee Farm. Pleasonton's soldiers pushed Price's rear guard across the Big Blue.
On October 23, Pleasonton attacked Confederate forces. These were led by Major General John S. Marmaduke at Byram's Ford. Pleasonton's troops pushed them back to a place called Potato Hill. The Union forces broke through Marmaduke's position. The rest of the Confederate army was defeated at the same time in the Battle of Westport. Price's wagon train managed to escape. But the Confederate army retreated south in chaos. Price's army lost over two-thirds of its men. They also lost equipment and supplies. The Union army was barely affected. This campaign was the last major battle west of the Mississippi River. Today, parts of the battlefield are saved in Big Blue Battlefield Park. Some areas are listed on the National Register of Historic Places.
Why the Battle Happened

The American Civil War started in April 1861. Missouri was a state that allowed slavery. But it did not leave the Union. The state was divided. Missouri's governor, Claiborne Fox Jackson, supported the Confederacy. Union forces, led by Nathaniel Lyon, were against this.
Confederate and pro-secession forces defeated Lyon at the Battle of Wilson's Creek. But by the end of 1861, they were pushed into southwestern Missouri. Missouri ended up with two governments. One supported the Union, and the other the Confederacy. By March 1862, the Union controlled Missouri. Confederate actions in Missouri became mostly raids and guerrilla warfare.
By September 1864, the Confederacy was losing the war. Abraham Lincoln, the US President, was likely to win re-election. General Edmund Kirby Smith commanded Confederate forces west of the Mississippi River. He was ordered to send his soldiers across the river. But the Union Navy controlled the river. So, a large crossing was impossible.
Instead, Smith decided to attack Union forces in his area. Confederate Major General Sterling Price and Thomas Caute Reynolds suggested invading Missouri. Smith approved Price's plan. They hoped the invasion would:
- Start a rebellion against Union control.
- Force Union troops away from other important war areas.
- Help George B. McClellan defeat Lincoln in the election.
Getting Ready for Battle
Price's army entered Missouri on September 19. They moved north. But they suffered a big loss at the Battle of Pilot Knob on September 27. Price then decided not to attack St. Louis. It had 9,000 Union soldiers defending it. Instead, he turned his army west. His new target was Jefferson City, the state capital.
Price's army moved slowly. They had a large wagon train. This gave the Union time to send more soldiers to Jefferson City. By the time Price arrived, the city was too strong to attack. So, he kept moving west along the Missouri River. Along the way, the Confederates gained new recruits and supplies. They also won the Battle of Glasgow and captured Sedalia.
Who Fought in the Battle?
Confederate Forces
Price's army was called the Army of Missouri. It had about 12,000 to 13,000 cavalry soldiers. They also had 14 cannons. But many soldiers had no weapons or poor ones. All their cannons were small. The Army of Missouri had three divisions. These were led by Major General James F. Fagan and Brigadier Generals Joseph O. Shelby and John S. Marmaduke. Each division had several brigades.
Union Forces
[[Location map many|Missouri|width =|float =left|border =|caption =Map of Missouri |alt =|relief =yes|AlternativeMap=|overlay_image = |label1=Independence|position1=top |coordinates1= 39°4′47″N 94°24′24″W / 39.07972°N 94.40667°W |label2=Lexington|position2=right |coordinates2= 39°11′4″N 93°52′20″W / 39.18444°N 93.87222°W |outside2 = 1 |label3=Warrensburg |position3=bottom |coordinates3= 38°45′47″N 93°44′6″W / 38.76306°N 93.73500°W |label4=Jefferson City |position4=right |coordinates4= 38°34′36″N 92°10′25″W / 38.57667°N 92.17361°W |label5=Kansas City |position5=bottom |coordinates5= 39°5′59″N 94°34′42″W / 39.09972°N 94.57833°W |label6=St. Louis |position6=bottom|coordinates6=38°37′38″N 90°11′52″W / 38.62722°N 90.19778°W }} Missouri was defended by the Union Department of the Missouri. Major General William S. Rosecrans was in charge. His forces started with about 10,000 men. Many were militia soldiers. They were spread out across the state.
In September, Major General Andrew Jackson Smith's troops arrived in St. Louis. They were there to help Rosecrans. On October 6, a Union cavalry division was formed. Major General Alfred Pleasonton commanded it. This division had a mix of Union Army troops and Missouri militia. It was supported by four cannons.
Union troops in Kansas were also called into action. Major General Samuel Ryan Curtis led them. The Kansas State Militia was also mobilized. Major General James G. Blunt was put in charge of the District of South Kansas. He was ordered to gather cavalry and move towards Kansas City. Blunt organized his force into three brigades. Two were Union Army troops, and one was Kansas militiamen.
Moving to the Big Blue River
_(page_67_crop).jpg)
On October 16, Curtis decided to move his forces into Missouri. He ordered Blunt to move east. Blunt's troops reached Lexington on October 18. But Price was only 20 miles (32 km) away. Blunt learned that the Kansas State Militia could not go further east than the Big Blue River.
Price attacked Blunt with Shelby's division at Lexington on October 19. This was the Second Battle of Lexington. The Union soldiers fought well. Blunt had to retreat that evening. The next day, Blunt fell back to the Little Blue River. He wanted to make a stand there. But Curtis ordered his troops back to Independence. A small group was left at the Little Blue as a rear guard.
Confederate troops attacked the rear guard on October 21. This started the Battle of Little Blue River. The Confederates pushed the Union troops back to Independence. Later that evening, the Union forces left Independence. They took positions behind the Big Blue River, 6 miles (9.7 km) to the west. The Confederates then occupied Independence. Pleasonton's division was also moving towards Price's army. They were 6 miles (9.7 km) east of the Little Blue.
Price was now caught between Curtis's and Pleasonton's armies. He planned a fake attack on the northern Union line at the Big Blue. He would then force his way across the river further south. Small fights would hold off Pleasonton. This would give Price's wagon train time to cross the Big Blue. Curtis's army had about 5,000 men. The Union line stretched 15 miles (24 km). It was strongest at its north end. Twelve cannons supported the Union position.
The Battle Begins: October 22
Shelby Crosses the Big Blue
Fighting at Byram's Ford
Around 8:00 AM, fighting started. Shelby's Confederates pushed Union skirmishers back across the Big Blue River. About an hour later, a Confederate brigade made a fake attack. This was against the north part of the Union line. But Curtis did not fall for the trick. He believed the main attack would be to the south.
Around 11:00 AM, Shelby decided to force a crossing at Byram's Ford. This ford was in the southern part of the Union line. Union soldiers had been at Byram's Ford since 9:00 AM. They had prepared defenses the night before. Trees and other things blocked the ford. But the Confederates had good cover on their side of the river. About 1,200 Union soldiers were on high ground west of the ford. Only a strong skirmish line and five small cannons defended the ford itself.
The first large Confederate force to reach Byram's Ford was Thompson's brigade. They had about 1,445 men. Their attacks were not successful. But they kept pressure on the Union position. The fighting lasted for three hours. Thompson and Shelby then decided to find other fords. They wanted to go around the Union defenses. Confederate soldiers found unguarded fords to the north and south.
These crossings led to a breakthrough. The Union soldiers were outflanked. They had to fall back. This opened the crossing at Byram's Ford. The Confederates quickly cleared the blockages. The Union brigade tried to retreat northwest. But Confederates who had crossed at Hinkle's Ford blocked them. The Union soldiers ended up retreating 4 miles (6.4 km) into Kansas.
The Mockbee Farm Fight
.jpg)
Union soldiers eventually reached the state line. They deployed next to another Union brigade. Confederate soldiers pressed the Union line. Curtis ordered a full retreat. But the 2nd Kansas State Militia Infantry Regiment was forced to fight off a Confederate attack.
Meanwhile, Union militia units south of Byram's Ford were in danger. They were about to be cut off from the main Union army. These retreating men met Confederate cavalry. They were quickly scattered. This left a single cannon and about 250 to 300 men from the 2nd Kansas State Militia Infantry Regiment isolated. They deployed at Thomas Mockbee's farm.
The Union gunners fired at the Confederates. The Confederates were hidden in a grove of trees. The Union artillery eventually found their range. They forced the Confederates into a ravine. The Union commander decided to hold at the Mockbee Farm. He hoped for reinforcements. Shelby, thinking he faced a larger force, sent more troops to the farm.
The Confederates attacked the Union position. But they were pushed back. A second attack also failed. For the third attack, the Confederates added new recruits and unarmed men. This time, the Confederates had too many soldiers. The Union unit and cannon were overrun. Union reinforcements arrived. But they were also overrun or retreated.
Independence and a Short Break
Pleasonton's Union forces were also active on October 22. They pushed the Confederate rear guard back at the Little Blue River. By 11:00 AM, Pleasonton's division had crossed the river. They pushed the Confederates towards Independence. This was part of the Second Battle of Independence.
By 1:30 PM, Union troops were near Independence. The Confederates had broken Curtis's line at the Big Blue. But Price's wagon train was still on the west side of the river. Confederate brigades made a stand at Independence. This bought time for the wagon train to cross. Union brigades attacked Independence. They drove the Confederates back. But the Union troops became too disorganized to chase them. The Union advance stopped at 10:30 PM. They were a few miles from the Big Blue.
That evening, Price set up his headquarters west of Byram's Ford. Shelby regrouped his men nearby. Curtis sent Blunt's troops to Westport. The Kansas State Militia went to Kansas City for supplies. By 3:00 AM on October 23, Curtis and Blunt had a battle plan. They would attack the Confederates at Brush Creek. Price also planned an attack in the Brush Creek area. Pleasonton's men were also moving. Price sent his wagon train south with two brigades to guard it.
The Final Push: October 23

Pleasonton Crosses the River
Fighting at the Ford
Pleasonton planned an attack on Byram's Ford. It was to be led by Brown's brigade. But Brown was late. Pleasonton arrived and arrested Brown and another officer for being late and disorganized. Colonel John F. Philips took over Brown's brigade. Another colonel was given overall command of the attack.
The Confederates had strengthened the defenses at the ford. Marmaduke's men defended it. One brigade was at the ford. Another was further west on Potato Hill. About 200 yards (180 m) west of the ford was a rock ledge. Potato Hill was several hundred yards further. Confederate cannons were on Potato Hill. About 2,700 Union soldiers faced about 2,500 Confederates.
Around 8:00 AM or 9:00 AM, the Union attack began. One Union regiment attacked but was quickly stopped. Another Union unit crossed the river at a ravine. They started firing into the Confederate side. The Union commander led another charge. The Confederates fell back. Some took positions along the rock ledge. Most fell back to the main Confederate line on the hilltop. The Union forces paused for about 30 minutes. They brought up more troops before attacking the main Confederate lines.
Taking Potato Hill
The path to Potato Hill sloped upwards. It was covered with tree stumps. The rock ledge and a log house on the hill gave cover to the Confederates. They also had sharpshooters in trees. The Union commander wanted to capture the position quickly. He ordered a charge. The path from the ford was narrow. So, only one Union unit went down the road. They were under fire from Confederate cannons. This unit attacked twice but was pushed back both times.
The Union commander then formed a line of soldiers. Almost all the Union troops got off their horses for the attack. Many had repeating rifles. This gave them a big advantage in firepower. The Confederate line was held by one brigade. Another was in reserve. Around 11:00 AM, the Union cavalry attacked.
As Union troops charged towards the rock ledge, their commander was shot in the leg. Another officer took over. Heavy Confederate fire stopped the attack. More Union troops were brought up. The Union soldiers rallied and charged again. They drove the Confederates back from the ledge. The Confederates moved their cannons back. A general Union attack followed. The top of Potato Hill was captured. The Confederates quickly retreated. By noon, the way was open for Pleasonton to join Curtis.
Confederate Collapse
Shelby's Confederate division was stuck in the Battle of Westport. He heard the sounds of fighting from Marmaduke's position. Shelby sent a brigade to help. But it was redirected. It met Union forces. They fought off a Union attack. Meanwhile, at Westport, a Union attack broke Shelby's brigade. Shelby's men fled.
Seeing his command falling apart, Shelby retreated. Union forces chased him. Shelby tried to make another stand. But he was hit by more Union brigades. Blunt's division also pushed south. A Confederate attack failed. The Confederate retreat became a stampede south.
McNeil and the Wagon Train
Price's wagon train was supposed to go south. It would cross the Big Blue River again. Then it would continue south. Union Brigadier General John McNeil's brigade was supposed to stop the wagon train. But McNeil started late. He halted at 4:00 AM. He saw Confederate campfires. He thought he was isolated and in danger. He paused for 90 minutes to send out scouts. They reported that the Confederates were leaving.
The Union troops continued south. They saw the Confederate wagon train around 9:00 AM or 10:00 AM. Price arrived and set up defenses to protect the train. About 4,000 or 5,000 Confederate soldiers guarded the train. But only about half of them had weapons. They also had cannons.
McNeil attacked the train around 1:00 PM or 2:00 PM. Union cannons fired. McNeil moved his brigade forward. Two Union cavalry companies attacked the Confederates. The Union 7th Kansas Cavalry Regiment was also involved. McNeil thought he was facing the entire Confederate army. So, he withdrew. The Union cavalry watched the Confederates retreat until nightfall. Price's men did not stop retreating until 9:00 PM. Most Union forces stopped for the night.
What Happened After
The total number of soldiers hurt or killed in the battle is not fully known. At the Mockbee Farm fight, about 43 Confederates were hurt or killed. About 50 Union soldiers were killed or wounded. And 68 were taken prisoner. Some Union prisoners were executed by Confederates. But Shelby stopped this. For the October 23 fighting at Byram's Ford and Potato Hill, records are incomplete. One estimate suggests Marmaduke lost about 50 men. Union losses were around 12 to 51 men in specific units. Other estimates for the October 23 fighting range from 122 to 200 Union soldiers killed or wounded.
After losing at Byram's Ford and Westport, Price's Confederates retreated south. On October 25, they lost three more battles. One was a terrible defeat at the Battle of Mine Creek in Kansas. Marmaduke was captured. The Confederates lost many men and cannons. After another defeat on October 28, Price's army retreated. They went through Indian Territory and reached Texas by December.
Price's campaign cost him over two-thirds of his men. He also lost equipment and supplies. The Union war effort was barely affected. This was the last major battle in the area west of the Mississippi River.
Today, part of the battlefield is listed on the National Register of Historic Places. It is part of the Byram's Ford Historic District. The Big Blue Battlefield Park protects 86.22 acres (34.89 ha) of the battlefield. It even has traces of the original earthworks. Much of the Byram's Ford battlefield is now covered by the growth of Kansas City. The American Battlefield Trust has helped save 39 acres (16 ha) of the battlefield.
Images for kids
-
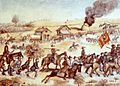
An 1865 depiction of Confederate cavalry escorting Union prisoners during Price's Raid, by Samuel J. Reader
See also
 In Spanish: Batalla de Byram's Ford para niños
