Second Battle of Independence facts for kids
Quick facts for kids Second Battle of Independence |
|||||||
|---|---|---|---|---|---|---|---|
| Part of Price's Raid during the American Civil War |
|||||||
 Map of the battlefield |
|||||||
|
|||||||
| Belligerents | |||||||
| Commanders and leaders | |||||||
| Alfred Pleasonton | Sterling Price | ||||||
| Units involved | |||||||
| Pleasonton's division | Army of Missouri | ||||||
| Strength | |||||||
| 7,000 | 7,000 | ||||||
| Casualties and losses | |||||||
| unknown | c. 400 | ||||||
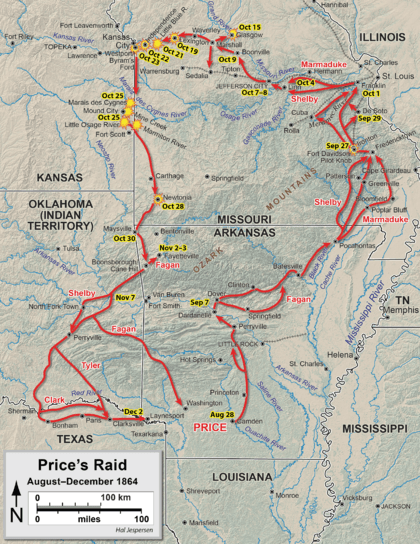
The Second Battle of Independence happened on October 22, 1864. It took place near Independence, Missouri, during the American Civil War. This battle was part of a larger plan called Price's Raid.
In late 1864, Sterling Price, a Confederate general, led his cavalry (soldiers on horseback) into Missouri. He hoped to start a rebellion against the Union government. He also wanted to pull Union troops away from other important areas. Another goal was to influence the 1864 United States presidential election.
Union forces, including the Union Army and Kansas State Militia, stood against Price. They were near Kansas City and led by General Samuel Ryan Curtis. Meanwhile, Union cavalry led by General Alfred Pleasonton followed Price from the east. They were trying to catch up to the Confederates from behind.
Price's men moved west along the Missouri River. On October 21, they met Curtis's Union troops at the Little Blue River. After winning the Battle of Little Blue River, the Confederates took over Independence. This city was about 7 miles (11 km) away.
On October 22, part of Price's army pushed Curtis's men across the Big Blue River. This happened about 6 miles (10 km) west of Independence. This fight was called the Battle of Byram's Ford. At the same time, General Pleasonton pushed back Confederate defenders from the Little Blue River.
Confederate troops from the divisions of Generals James F. Fagan and John S. Marmaduke fought against Pleasonton. Two Union brigades forced the Confederates through Independence. They captured two cannons and 300 Confederate soldiers. Pleasonton then brought up two fresh brigades. The Confederates regrouped southwest of the town. More Union pressure pushed the defenders back. Fighting continued until after dark. By the end of October 22, most Confederate forces had crossed back over the Big Blue River.
The next day, Price lost the Battle of Westport. His men retreated through Kansas, suffering more defeats. They finally reached Texas. The Confederates lost many soldiers during this campaign. Today, the city of Independence has grown. Much of the battlefield is now covered by buildings. This means it's hard to preserve the historical site.
Contents
Why the Battle Happened
When the American Civil War started in 1861, Missouri was divided. It allowed slavery but did not officially leave the Union. Missouri's governor, Claiborne Fox Jackson, supported the Confederacy. But Union forces, led by General Nathaniel Lyon, were against this.
Confederate and pro-secession forces won a battle at Wilson's Creek in August 1861. However, by the end of that year, they were mostly in southwestern Missouri. The state ended up with two governments: one for the Union and one for the Confederacy.
By March 1862, the Union controlled Missouri. This happened after the Battle of Pea Ridge in Arkansas. After that, Confederate actions in Missouri were mostly small raids and guerrilla warfare (small, surprise attacks).
By September 1864, the Confederacy was struggling to win the war. President Abraham Lincoln was likely to win the 1864 United States presidential election. The Confederacy faced tough times in the east. So, General Edmund Kirby Smith was told to send his soldiers across the Mississippi River. But the Union Navy controlled the river, making this impossible.
Instead, Smith decided to attack, even with limited resources. General Sterling Price and Missouri's Confederate Governor, Thomas Caute Reynolds, suggested invading Missouri. Smith approved this plan and put Price in charge. The invasion aimed to:
- Start a rebellion against Union control in Missouri.
- Draw Union troops away from other important war areas.
- Help George B. McClellan (who wanted peace) win against Lincoln in the election.
Smith told Price to make St. Louis his main target. If forced to retreat, Price was to go through Kansas and the Indian Territory. He was also to gather supplies along the way.
Getting Ready for Battle
Price's army entered Missouri on September 19. They moved north but suffered a big loss at the Battle of Pilot Knob on September 27. After losing many soldiers, Price decided not to attack St. Louis. The city had been reinforced with 9,000 Union soldiers.
Instead, Price turned his army west toward Jefferson City, the state capital. Price's army moved slowly because of a large wagon train. This gave the Union soldiers in Jefferson City time to get stronger. Their numbers grew from 1,000 to 7,000 men. These reinforcements included two cavalry brigades and some local militia.
When Price reached Jefferson City in early October, he decided it was too strong to attack. He then gave up on taking over Missouri. He moved west toward Kansas, following his original orders. As they moved west along the Missouri River, the Confederates gathered new recruits and supplies. They also won the Battle of Glasgow and captured Sedalia.
Who Was Fighting
Price's army, called the Army of Missouri, had about 12,000 to 13,000 cavalry soldiers. They also had 14 cannons. However, many of these soldiers were not armed well. All of Price's cannons were small. The Army of Missouri was split into three divisions. These were led by Generals Joseph O. Shelby, John S. Marmaduke, and James F. Fagan. Each division had smaller groups called brigades.
Against Price was the Department of the Missouri. This Union force was led by General William Rosecrans. Many of his 10,000 men were militia (citizen soldiers). They were spread out across the state. In September, Rosecrans got more soldiers in St. Louis.
A Union cavalry division was formed on October 6. It was in Jefferson City and led by General Alfred Pleasonton. Pleasonton's group had four brigades and 12 cannons. These brigades were a mix of Union Army soldiers and Missouri militia. They were led by Generals Egbert B. Brown, John McNeil, John B. Sanborn, and Colonel Edward Francis Winslow.
On the other side of the state, the Union Army of the Border was formed. It was led by General Samuel R. Curtis. This army had Union soldiers and men from the Kansas State Militia. The Army of the Border was split into two parts. One was led by General George W. Dietzler and the other by General James G. Blunt. Blunt's soldiers moved east toward Price. But Kansas politicians stopped the militiamen from going further into Missouri than the Big Blue River.
Lexington and Little Blue River Battles
On October 18, General Blunt took over the town of Lexington, Missouri. He hoped to work with General Sanborn. But Sanborn was too far away, and Price's army was only 20 miles (32 km) to the east. Blunt decided to hold the town and fight Price.
Price attacked with Shelby's division on October 19. This led to the Second Battle of Lexington. Shelby's men could not easily remove the Union defenders. But the Confederates captured the town after Marmaduke's and Fagan's divisions joined the fight.
The morning after the battle, Blunt stopped his retreat at the Little Blue River. He wanted to make a stand there. But he could not get more soldiers because of rules about the Kansas State Militia. Curtis ordered Blunt to fall back to the main Union position in Independence, Missouri. Only one regiment (a military unit) and four cannons were left at the Little Blue as a rear guard (a group protecting the main force from behind). This group had about 400 to 600 men.
On the morning of October 21, a Confederate brigade attacked the Union rear guard. They forced their way across the river, starting the Battle of Little Blue River. The fighting went back and forth. Blunt got permission to bring his troops back to the Little Blue River line. Price brought up Shelby's division.
The two sides formed stronger lines. Shelby continued his attack. Confederate threats to the Union's left flank (the side of a military formation) made Union troops move from the center. This weakened the center, making it open to Confederate attack. A little after 2:00 PM, the Union troops started retreating. They fell back to Independence. Late that evening, Blunt ordered Independence to be left. He moved his men to the Big Blue River, 6 miles (10 km) to the west. By nightfall, Curtis's and Blunt's men were west of the Big Blue. Price had taken over Independence.
The Battle for Independence
From Little Blue to Independence
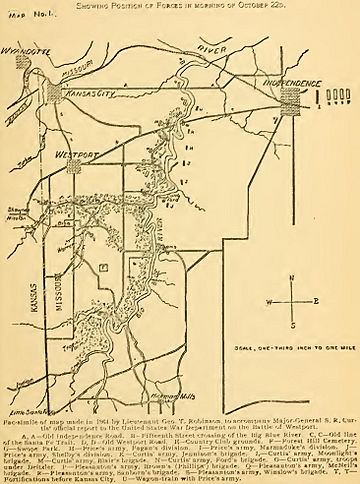
On October 22, Price made a feinting attack (a fake attack) on the north part of the Big Blue River line. Meanwhile, Shelby's division attacked strongly further south. This started the Battle of Byram's Ford. The attack pushed the Union line back toward Westport. Price moved most of his army across the Big Blue.
Fagan's division, with 4,500 men, stayed in Independence as a rear guard. Marmaduke's division, with 2,500 men, was between Fagan and Shelby. Before Pleasonton took command on October 20, his cavalry had not made much progress. Rosecrans and Smith had been following the cavalry with their infantry (foot soldiers). But with Pleasonton in charge, the cavalry moved much faster. They reached Lexington a day before the infantry.
Rosecrans knew Price would eventually have to turn south to return to Confederate land. He wanted Smith and Pleasonton to move south and block Price's retreat path. But Pleasonton was too far ahead. His 7,000 cavalrymen were almost at the Confederate line. On the morning of October 22, Rosecrans changed his plans. He allowed Pleasonton to chase Price directly. Smith's infantry had already started moving south. They had to turn around and march north again.
The two sides met at 5:00 AM at the Little Blue River. Confederate pickets (guards) were there. Union cavalry forced the Confederate guards back. But they were delayed by a burned bridge. An artillery battery (a group of cannons) crossed the river by 10:00 AM. Union soldiers spent two hours pushing back the Confederates.
The Union cavalry had gone about 3 miles (5 km) of the 7 miles (11 km) to Independence by 1:30 PM. Price and Fagan learned about the fighting. A Confederate brigade was sent to help the rear guard. These new soldiers moved to the front. The original rear guard fell back. Price's wagon train had not fully crossed the Big Blue River yet. The Confederates had to hold Independence long enough for the wagons to cross. Price was caught between two Union forces.
Confederates Driven Out of Independence
The Union attack started again around 2:00 PM. Union cavalry moved forward. Despite support from Confederate cannons, the Confederate brigade was forced back into Independence. There, they were joined by more Confederate brigades. General Pleasonton sent another Union brigade into the fight. An attack was made with the 2nd Arkansas Cavalry Regiment leading.
The Union attack was meant to be coordinated. But the 2nd Arkansas Cavalry started their advance early. They were halfway to Independence when the rest of the Union force began moving. After the 2nd Arkansas Cavalry entered the town, the soldiers got off their horses. They got ready for hand-to-hand combat. The attack pushed the Confederates to the west and southwest. But the Union forces did not chase them because they were tired.
Another Union attack was led by the 13th Missouri Cavalry. Confederates tried to block their path with a chain across the road. But a Union civilian removed this obstacle.
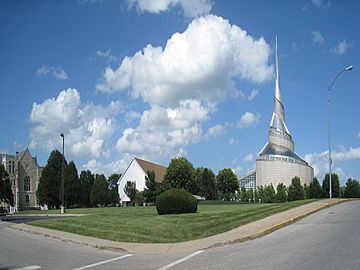
The 13th Missouri Cavalry's attack broke Confederate resistance at the Temple Lot. This was a religious site. The Union soldiers also charged the Confederate cannons and their supporting soldiers. Union fire shot down all the cannon horses. The cannon crew and their support ran away. The commander of the cannon unit, two cannons, and 300 Confederates were captured. One Confederate general almost got captured and lost his sword. The 13th Missouri Cavalry lost only 10 men in this charge.
The attack was successful. But the Union troops were too disorganized and tired to keep going. Also, Confederate soldiers resisted in Independence until about 5:00 PM. They knew Price's supply train was crossing the Big Blue. Pleasonton brought up two fresh brigades. These new brigades were to attack the Confederates. The tired brigades stayed in Independence to help. They took over a local bank and hotel for hospitals. They also rescued 40 wounded Union soldiers who had been captured earlier.
To the Big Blue River
Pleasonton wanted a fresh brigade to attack. But the attack was slow to start. This allowed the Confederates to regroup about 1 mile (1.6 km) southwest of Independence. The Union brigade finally attacked about an hour before nightfall. But it was not as strong as planned.
The Union attack pushed the Confederates back 2 miles (3.2 km). But the Union soldiers started running low on ammunition. One regiment fired 11,700 rounds during its part of the fight. After running low on ammunition, these Union soldiers moved off the road. This allowed another Union brigade to move to the front.
This new Union brigade continued fighting as darkness fell. They quickly pushed back two Confederate brigades. A Confederate brigade formed a rear guard with its cannons. This slowed the Union attack. Fighting at night was rare during the Civil War. But one Union cavalry regiment kept advancing overnight. It pushed the Confederate regiments back.
Around 10:00 PM, the Confederate wagon train finished crossing the Big Blue River. Soon after, almost all Confederate units had crossed the river too. By this point, Union troops were only a few miles from the Big Blue River. After coming under fire from the last Confederate regiment, the Union brigade stopped its chase around 10:30 PM.
What Happened Next
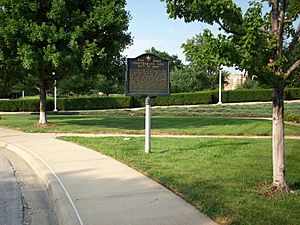
General Pleasonton said he captured 400 prisoners. He also found 40 dead Confederates. Price said he lost 300 or 400 men. On the Union side, one brigade had the most losses. One historical guide says Union losses are unknown. It states Price's loss was 140 men.
Price was worried about his wagon train. He ordered it to move at daylight toward Little Santa Fe. This was a community near the Missouri/Kansas state line. Two brigades were assigned to guard the train. One general was told to fight Pleasonton. Two other divisions were to attack Curtis.
On October 23, two Confederate generals fought General Blunt in the Battle of Westport. The Confederate line held at first. But then, men from the Kansas State Militia arrived. This turned the battle in favor of the Union. Also, Pleasonton sent one of his brigades to bother the Confederate wagon train. He attacked another Confederate general with the rest of his division.
The Union troops broke through the Confederate line. They attacked the side of the Westport line. Price was fighting both Curtis and Pleasonton. Smith's infantrymen were also getting close. So, Price retreated into Kansas. More fighting happened during the retreat. This included a big Confederate defeat at the Battle of Mine Creek on October 25.
Union soldiers chased Price until November 8. Price retreated all the way to Texas. He had brought 12,000 or 13,000 men into Missouri. He returned with only about 3,500.
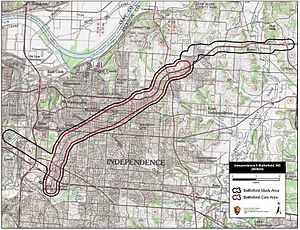
Over the years, the battlefield has been built over. This is because Independence has grown. A study in 1993 said the battlefield was "severely fragmented." A 2011 study said the battlefield was "beyond hope of meaningful landscape preservation." As of 2011, none of the battlefield was on the National Register of Historic Places. The 2011 study found it would not be eligible. The area is part of Freedom's Frontier National Heritage Area. The City of Independence has a self-guided tour of 10 sites related to the battlefield.
|
See also
 In Spanish: Segunda batalla de Independence para niños


