
Anglo-Persian War facts for kids
Quick facts for kids Anglo-Persian War |
|||||||
|---|---|---|---|---|---|---|---|
| Part of The Great Game | |||||||
 Battle of Khushab (1857) by Illustrated London News |
|||||||
|
|||||||
| Belligerents | |||||||
|
|
|||||||
| Commanders and leaders | |||||||
| Strength | |||||||
|
British Expeditionary Force:
|
Fars Division:
Khanlar Mirza's Army:
|
||||||
| Casualties and losses | |||||||
| 250+ | 700+ | ||||||
The Anglo-Persian War (also called the Anglo-Iranian War) was a short conflict between the United Kingdom and Iran. It took place from November 1, 1856, to April 4, 1857. The main reason for the war was Iran's attempt to take control of the city of Herat.
At the time, Herat was part of Iran under the Qajar dynasty. However, it had declared itself independent and sought protection from the British in India. Herat also allied with the Emirate of Kabul, which is now Afghanistan. The British, led by Major General Sir James Outram, fought in two main areas: along the southern coast of Persia near Bushehr and in southern Mesopotamia.
The war ended with Persia agreeing to leave Herat. They signed the Treaty of Paris, giving up their claims to the city. In return, the British left southern Iran.
Contents
Why Did the War Start?
The Great Game and Herat's Importance
The Anglo-Persian War was part of a bigger rivalry called The Great Game. This was a struggle between Britain and Russia for power in Central Asia. Britain wanted Afghanistan to stay independent. They saw it as a buffer state to protect India from Russian expansion.
Britain worried that if Persia gained more power in Afghanistan, Russia would also become more influential. Persia had many foreign provinces under its control. In 1856, Persia tried again to take Herat and succeeded on October 25. This went against an earlier treaty with Britain. Because of this, the British governor-general in India declared war on November 1.
A Diplomatic Dispute Escalates
Before the conflict over Herat, there was another issue involving Mirza Hashem Khan. The British ambassador wanted him as a secretary in Tehran. The Persians disagreed. Rumors spread that the British ambassador had an improper relationship with Mirza Hashem Khan's wife. She was also the sister of the Shah's main wife.
The dispute grew worse when the Persians arrested the woman. The British ambassador ended relations when they refused to release her. British forces began to gather because of this incident. However, it's likely the war would not have gone beyond occupying a few islands if the Herat issue had not come up.
The War in 1856

The Persian army had about 86,700 soldiers on paper. But Tehran could only gather about 20,000 for battle. Many Persian soldiers were from Azerbaijan. Their artillery (Toop Khaneh) was the only part of the army good with long-range guns. Most of their 120 guns were not very powerful.
The army used mules, horses, and camels for transport. Carriages were rare. Most Persian soldiers had very low morale, except for a few Imperial Guard regiments. Soldiers were often paid very little, and sometimes not even their full salary.
General (Amir-Nuyan) Mehr Ali Khan Nuri Shoja ol-Molk led the Persian army against the British at the Battle of Khoshab. He was promoted to lead the Fars Army in 1855. When the British invaded, he became the temporary commander-in-chief of the entire southern Persian army. He was a respected officer in the Qajar military.
British Strategy and Forces
The British government had a unique goal for this war. They wanted to defeat Persia but also ensure its government and army remained strong. This was to prevent Russia from expanding into the region. So, the British cabinet set rules for their forces:
- They would not try to overthrow the Shah.
- They would not encourage Persian people to rebel.
- They would not recruit Persian people into the British Army.
The British had two options: attack Persia by land through Afghanistan or by sea through the Persian Gulf. After a difficult First Anglo-Afghan War, Britain did not want to send troops overland to help Herat directly. So, they chose to attack the Persian Gulf coast. They ordered the government in India to send a naval force to attack Bushehr, which was Persia's main port at the time.
A first division of about 5,700 troops (2,300 British and 3,400 Indian soldiers) landed in Persia in early December 1856. This force included engineers from the Bombay Sappers & Miners. Later, a second division was formed, and the entire expedition was put under the command of Major General Sir James Outram. This larger force arrived in January 1857.
The British fleet sailed from Bombay in November. They captured Kharag Island on December 4. On December 9, they landed near Bushire, Persia's main port.
Battle of Bushehr

The British forces landed near Bushehr on December 5, 1856. They attacked the old fort at Reshire and captured it. After a short naval attack, they took the city of Bushehr on December 10. The Bombay Sappers & Miners helped greatly in this capture. The British then waited for more troops.
Scouts found a Persian force of 4,000 soldiers at Shiraz. The first British division was considered too small to move inland. This led to the second division arriving from India in late January. Sir James Outram arrived in Bushehr on January 20 to take command.
The Persian government in Tehran issued a statement on December 24, 1856. They said they wanted peace and had told their southern forces not to prepare for war. They claimed the British declaration of war was not properly given to them. They explained Bushehr's fall as a result of this. After Bushehr was taken, Persia sent troops to Mohammareh, expecting another attack there.
The War in 1857
British Forces Prepare for More Action
The British invasion force was split into two divisions. Sir James Outram was in charge of all British operations in Iran. The first division, which had landed at Bushehr, was led by Major-General Stalker. The second division was led by Brigadier-General Havelock and Outram himself. Outram was given the temporary rank of lieutenant-general.
The British ships set sail on January 19, 1857. They reached the Strait of Hormuz with few problems. By January 30, the British squadron anchored off Bushehr. The next morning, the troops disembarked and joined the forces already there. With the new troops, the camp had plenty of supplies.
On February 3, the entire British force marched through the night to the village of Chahkootah. On February 5, they moved towards Borazjan. The Persian army was dug in there with 18 guns.
Capture of Borazjan
The British army saw Persian scouts as they approached Borazjan. The Persian army decided to leave Borazjan to avoid a direct fight. General Mehr Ali Khan Shoja ol-Molk had been told that the British had 13,000 infantry, 1,000 cavalry, and 28 guns, which was an overestimate. The Persians left quickly to avoid heavy losses and prevent their unsecured ammunition from exploding. They left behind a small group to cover their retreat. The British captured a lot of ammunition and grain.
Persian Army Strength
Outram estimated the Persian forces at Borazjan to be 8,450 regular infantry and cavalry, with 17 guns. Tehran had planned to send more troops, up to 12 regiments and 35 guns. Provincial governors were also preparing to gather 4,000 irregular infantry.
Tahmasp Mirza Mo’ayed ol-Dowleh, the Governor-General of the province of Fars, ordered more regiments to join Shoja ol-Molk.
March Back to Bushehr and Persian Ambush
The British army began marching back to Bushehr at 8:00 PM on February 7. They had taken supplies from the Persian camp and captured the town's governor. At 11:00 PM, a group of 300 Qashqai cavalry attacked the British camp. Soon after midnight, Persian forces attacked the British rear-guard. The British fired back with muskets and two horse-artillery guns.
The Persian cavalry surrounded the British, trying to scare them by sounding British bugle-calls. Persian soldiers had learned these calls from British officers who used to work for the Qajar military. Some British soldiers were confused, thinking their own side was firing. The Persian cavalry fought the 78th Highlanders directly. The British formed a defensive shape as Persian artillery fired. The Persian artillery was accurate, but there were few casualties. During the fight, Outram's horse fell on him, injuring him. His chief of staff, Colonel Lugard, took command and kept Outram's injury a secret until morning.
Battle of Khushab
The Persian guns kept firing until dawn. The Persian army gathered near the British camp, ready for battle. Sources say the Persian army had between 7,000 and 8,000 troops. On the morning of February 8, the Persian army, led by Shoja ol-Molk, lined up with their right side near the village of Khushab. Their left side was protected by a tower. Shoja ol-Molk placed most of his guns in the center.

As the morning mist cleared, both sides began firing cannons. The British brigades moved into position, forming two lines. The 78th Highlanders and Indian engineers were on the right of the first line. Other regiments were on the left. The second line included the 64th Regiment and other units. Outram placed light infantry to counter the Persian center.
The Persian army included the 1st Qashqai Regiment on their left. Other units were from Bushehr, Kazerun, and Shiraz. The Qashqai Cavalry, led by Sohrab Khan, was divided into two groups. Two artillery squadrons were in the center, and four others were on the flanks. The Persian army mainly used their reformed regular regiments.
As the British lines advanced, they had few casualties at first. The British artillery moved closer and fired, reducing the Persian bombardment. Sohrab Khan charged with the Qashqai cavalry on the Persian left. British cavalry met them, supported by horse-artillery. The British pushed back Sohrab Khan's cavalry, forcing them to retreat.

The British infantry advanced quickly. The 3rd Bombay Light Cavalry and the Poona Horse charged the Persian infantry on the left. The 1st Qashqai Regiment formed a square and fired at the charging British cavalry. During this close fight, the Persian regiment's flag-bearer was shot, and the flag was captured by the 3rd Cavalry. This flag, with a silver hand symbol, is now part of the Poona Horse Regiment's standard. This event was seen as very brave by the British media. Two Victoria Crosses, high awards for bravery, were given to Lieutenant Arthur Thomas Moore and Captain John Grant Malcolmson for their actions.
The Persian infantry on the right began to flee. The Poona Horse disabled two Persian guns. The Persian cavalry stayed on the battlefield for a while but left before 10:00 AM due to the long range of the new Enfield rifles. The British reported about 20 killed and 64 wounded. They claimed about 700 Persian casualties and considered it a British victory. Despite winning, Outram decided not to advance further towards Shiraz because his army lacked supplies. The Persian government, however, claimed Khoshab as a Persian victory.
By 10:00 AM, the British army regrouped and marched back to Bushehr. They avoided the main road due to fear of attacks from local fighters. Outram went to Shif and took the coastal route. Even so, they were ambushed by fighters from Ziarat. Shoja ol-Molk retreated and asked the Shah for reinforcements. By February 14, Tehran removed Shoja ol-Molk from command. Mirza Mohammad Khan Qajar-Dolu took over the southern Persian army. He was joined by Hamzeh Mirza Qajar Heshmat ol-Dowleh, the Shah's uncle.
The British army marched back to Bushehr in terrible conditions, with heavy rains and deep mud.
Return to Bushehr
The British army reached their camp at Bushehr on the morning of February 10. They rested for a few days. Brigadier-General Havelock took command of the second division. The British began building defenses around their camp. More troops and guns joined them. The arrival of the 23rd Native Light Infantry and horse artillery made them consider attacking Mohammareh.
Outram believed the Persian government could not raise many more troops beyond those at Mohammareh and the army they faced at Khushab. He did not expect the Shah to recall his forces from Herat. The British thought they could force the Shah to agree to their demands by working with some semi-independent groups in Iran's northwest. This made Mohammareh a very important target for the British.
The Persian Army Under Mirza Mohammad Khan
_b_084.jpg)
By February 22, Persian troops were near the British camp at Bushehr but did not attack. The British saw enemy fires on the hills. The Poona Horse expanded its patrols but found no direct fights. Outram reported to Governor-General Canning that Mirza Mohammad Khan's new army had about 27,800 men and 85 guns. This included cavalry, musketeers, and regular infantry. This was separate from the 10,000 to 13,000 troops and 16 guns at Mohammareh under Prince Khanlar Mirza.
Governor-General Tahmasp Mirza moved his regiments from Shiraz to Nanizak. He was waiting for General Mirza Mohammad Khan Qajar-Dolu to arrive. Mohammad Khan had ordered several groups to meet at Nanizak by March 6 to form a larger army to attack Bushehr.
Battle of Mohammareh
The British then moved their focus north up the Persian Gulf. They invaded Southern Mesopotamia by going up the Shatt al-Arab waterway to Mohammerah. The force for this attack had 1,500 British and 2,400 Indian soldiers. Engineers from the Bombay and Madras Sappers were also part of this force. Outram decided to stay in command at Bushehr and initially left the attack on Mohammareh to Havelock. However, Outram later joined the troops near Mohammareh himself.

,_Qajar_Persia,_dated_October-November_1866.jpg)
The defense of Mohammareh was given to Prince Khanlar Mirza. He commanded seven regular regiments with 13,000 infantry and cavalry. The Persian army had built strong defenses along the city's coast. Khanlar Mirza had 17 guns placed there for the British attack. Khanlar Mirza was the 17th son of the late Abbas Mirza and an uncle to Naser al-Din Shah.
The forts at Mohammareh were 20 feet thick. The Persian heavy guns were placed facing the river. The British ships would counter with their powerful cannons. Mohammareh was also protected because the British did not want to violate Ottoman territory, as the city was right on the border.
On March 6, British ships sailed towards the Euphrates. By March 8, they reached the river's mouth. Persian cavalry patrols saw the enemy. A Persian officer inspected 3,000 infantry near the coast to show force. The British were also aware of Persian cavalry and infantry occupying a nearby village. A French captain warned the British that the Persian defenses were strong. By March 15, more British troops arrived.
The British force waited until March 23. On March 24, they set their meeting point three miles below the Persian forts. Persian scouts saw the British but did not attack. On the night of March 25, Persian soldiers built an embankment for two field guns. The British ship Assaye fired shells, forcing the Persian artillerymen to retreat. That same night, the British placed mortars on a raft behind a swampy island to fire at the Persian army's strongest battery.
At dawn on March 26, the mortars opened fire on the Persian forts. The first shots wounded the Persian Brigadier. It took a few minutes for the Persian artillerymen to figure out where the shots came from. By 6:00 AM, the Persian batteries fired back as British attack ships advanced. The British ships took damage to their hulls and rigging. Arab people on the Turkish side of the border watched the battle, but scattered when Persian shots came their way.
By 7:45 AM, the British commodore ordered the ships to get closer to the forts. The British ships and Persian batteries fired at each other for three hours. The British transports then brought troops. The Berenice, carrying Havelock and the 78th Highlanders, was damaged as it got within 100 yards of the Persian battery. The troops disembarked about 100 yards above the Persian army's north battery. The landing took an hour and faced no opposition.
As the Persian batteries stopped firing, their brigadiers retreated. The British troops halted to organize their lines. The Persians effectively abandoned the city to a British force led by Brigadier Henry Havelock, who captured it on March 27. The Persian retreat was likely due to orders from Tehran to avoid direct conflict with the superior British navy. The British reported 41 men lost at Mohammareh. The Persian army of 13,000 retreated to Ahvaz along the Karun river.
Battle of Ahvaz
The British engineers were busy destroying Persian defenses, building roads, and setting up camps in the unhealthy climate. So, they could not join the attack on Ahvaz. The Royal Navy and soldiers from the 64th Foot and 78th Highlanders attacked the Persian forces there. The town fell to the British on April 1, 1857.
Treaty of Paris (1857)
When the British forces returned to Muhammarah on April 4, they learned that a peace treaty had been signed in Paris on March 4. This meant the fighting had stopped. When news of peace arrived, Outram was planning a larger invasion into Persia. The British forces had achieved their goal by capturing Bushire, defeating the Persians at Khoosh-Ab, and gaining a foothold in southern Mesopotamia. This forced the Persians to seek peace. Over the next few months, the British forces returned to India. In October, they left Bushire. Many of these troops were soon needed to fight in the Indian Mutiny, where both Havelock and Outram became famous during the siege of Lucknow.
Diplomacy
Negotiations happened in Constantinople between Persian Ambassador Farrokh Khan and British Ambassador Stratford de Redcliffe. Talks broke down when the British demanded that Persia replace its prime minister. When news of the fighting started, talks formally stopped. But discussions soon began again in Paris. Both sides signed a peace treaty on March 4.
In the treaty, the Shah agreed to:
- Withdraw from Herat.
- Not interfere in Afghanistan's affairs again.
- Apologize to the British ambassador upon his return.
- Sign a trade treaty.
- Help stop the slave trade in the Persian Gulf.
The British agreed to:
- Not protect opponents of the Shah in their embassy.
- Drop their demand for replacing the prime minister.
- Give up their demand for land from the Imam of Muscat, a British ally.
The Persians kept their promise and left Herat. This allowed the British to send their troops back to India, where they were soon needed for the Indian Mutiny. Herat later came under more direct Afghan control when Dost Mohammed Khan retook it in 1863.
Gallantry Awards
Three Victoria Crosses, which are awards for extreme bravery, were given during this war. They went to Captain John Augustus Wood, Captain John Grant Malcolmson, and Lieutenant Arthur Thomas Moore.
Battle Honours
Four battle honours were given for this campaign: 'Persia', 'Reshire', 'Koosh-Ab' (in 1858), and 'Bushire' (in 1861). These honors recognize the units that fought bravely in these battles.
Persia
The 'Persia' battle honour was given to all units that took part in the campaign in 1858. These units included:
- 3rd Bombay Cavalry (now Poona Horse)
- Poona Irregular Horse (now Poona Horse)
- 1st Scinde Irregular Horse (now Scinde Horse)
- Madras Sappers & Miners (now Madras Engineer Group)
- Bombay Sappers & Miners (now Bombay Engineer Group)
- 4th Bombay Infantry
- 20th Bombay Infantry
- 23rd Bombay Infantry
- 26th Bombay Infantry
Reshire
This honor was given to units that attacked the old fort of Reshire on December 7, 1856. The fort surrendered on December 8. Units that received this honor in 1858 included:
- 3rd Bombay Cavalry
- Bombay Sappers & Miners
- 4th Bombay Infantry
- 20th Bombay Infantry
- 26th Bombay Infantry
Bushire
The first British division landed near Bushire on December 5, 1856. After a naval attack, Bushire was taken without a fight. This honor was given in 1861. Units included:
- Poona Horse
- Bombay Sappers & Miners
- 4th Bombay Infantry
- 20th Bombay Infantry
- 26th Bombay Infantry
- 3rd Regiment Local Contingent (no longer exists)
Koosh-Ab
After the commander arrived, the British force moved inland and defeated the Persian army at Koosh-Ab on February 8, 1857. The Poona Horse has a special flag with a silver hand and a Persian writing. This flag was captured at Koosh-Ab, remembering the brave charge of the 3rd Bombay Light Cavalry that helped win the battle. This honor was given in 1858. Units included:
- 3rd Bombay Cavalry
- Poona Irregular Horse
- Bombay Sappers and Miners
- 4th Bombay Infantry
- 20th Bombay Infantry
- 26th Bombay Infantry
- 2nd Baluch Battalion
See Also
Images for kids
-
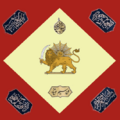
A modern picture of the standard of the Persian Nezam Infantry Regiments during Naser al-Din Shah's reign.
-
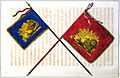
A traditional standard of the Persian Nezam Infantry Regiments from 1807 to 1848. The Silver Hand of Ali is on top.
-
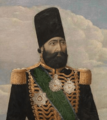
Portrait of Mirza Mohammad Khan Qajar-Davalu at the annual Royal Inspection of Qajar troops.
-
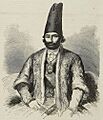
Farrokh Khan in The Illustrated London News, 1857.


