
Battle of the Chesapeake facts for kids
Quick facts for kids Battle of the Chesapeake |
|||||||
|---|---|---|---|---|---|---|---|
| Part of the American War of Independence and Siege of Yorktown (1781) | |||||||
 The French line (left) and British line (right) do battle |
|||||||
|
|||||||
| Belligerents | |||||||
| Commanders and leaders | |||||||
| Strength | |||||||
| 24 ships of the line with 1,542 guns | 19 ships of the line with 1,410 guns | ||||||
| Casualties and losses | |||||||
| 220 killed or wounded 2 ships damaged |
90 killed 246 wounded 5 ships damaged 1 ship scuttled |
||||||
The Battle of the Chesapeake, also known as the Battle of the Virginia Capes, was a very important naval battle. It happened during the American Revolutionary War on September 5, 1781. The battle took place near the entrance of the Chesapeake Bay.
The fight was between a British fleet led by Admiral Sir Thomas Graves and a French fleet. The French fleet was commanded by Admiral Comte de Grasse. This battle was a huge turning point in the war. It stopped the British Navy from sending more soldiers or supplies to General Lord Cornwallis. His forces were trapped at Yorktown, Virginia.
The French fleet gained control of the sea. This allowed them to bring important siege cannons and more French soldiers to the American and French armies. These supplies and troops were key to winning the Siege of Yorktown. This victory at Yorktown helped secure independence for the Thirteen Colonies.
Admiral de Grasse chose to attack British forces in Virginia. He arrived at the Chesapeake Bay in late August. Admiral Graves knew de Grasse was sailing from the West Indies. He also knew that another French Admiral, de Barras, was sailing from Newport, Rhode Island. Graves thought they would meet at the Chesapeake. So, he sailed south from Sandy Hook, New Jersey, with 19 warships.
Graves arrived at the Chesapeake Bay on September 5. He saw de Grasse's fleet already anchored there. De Grasse quickly got 24 of his warships ready for battle. He sailed out to meet the British. The battle lasted about two hours. Not all ships fought closely; only the front and middle parts of the fleets were fully involved. The battle was quite even, but the British had more casualties and damaged ships. The fighting stopped when the sun went down.
The two fleets stayed in sight of each other for several days. De Grasse wanted to draw the British away from the bay. This would allow de Barras to arrive with important siege equipment. On September 13, de Grasse broke away from the British. He returned to the Chesapeake Bay, where de Barras had already arrived. Graves went back to New York to plan a bigger rescue mission. But this mission did not sail until October 19. That was two days after Cornwallis surrendered.
Contents
Why the Battle Happened
During early 1781, both British and American rebel forces gathered in Virginia. Before this, Virginia had mostly seen only small naval attacks. British forces were first led by Benedict Arnold. Then William Phillips took over. Finally, General Charles, Earl Cornwallis, arrived in late May. He took command of the British southern army.
In June, Cornwallis marched to Williamsburg. He received confusing orders from General Sir Henry Clinton. These orders told him to set up a strong deep-water port. This port would allow ships to bring supplies by sea. Because of these orders, Cornwallis moved to Yorktown in late July. His army started building defenses there.
With British troops and General Clinton wanting a port, controlling the Chesapeake Bay became very important. Both sides needed to control the bay.
On May 21, Generals George Washington and Rochambeau met. Washington led the Continental Army. Rochambeau led the French army in America. They met in Newport, Rhode Island. They talked about attacking British forces in New York City or Virginia. Both plans needed help from the French fleet. This fleet was then in the West Indies.
They sent a ship to meet with French Admiral de Grasse. He was expected at Cap-Français (now Cap-Haïtien, Haiti). The message explained their plans and asked for his help. Rochambeau secretly told de Grasse that he preferred an attack on Virginia. The two generals then moved their armies to White Plains, New York. They studied New York's defenses and waited for news from de Grasse.
- Commanding officers
-
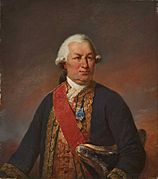
French Admiral de Grasse, painted by Jean-Baptiste Mauzaisse
-
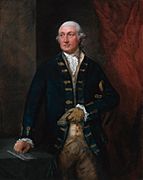
British Admiral Thomas Graves, painted by Thomas Gainsborough


Fleets Arrive for Battle
De Grasse reached Cap-Français on August 15. He immediately sent a reply to Rochambeau. He said he would sail for the Chesapeake. De Grasse took 3,200 soldiers onto his ships. He sailed from Cap-Français with his entire fleet of 28 warships. He sailed away from normal shipping routes to avoid being seen. He arrived at the Chesapeake Bay on August 30. He landed the soldiers to help block Cornwallis by land. Two British frigates that should have been on patrol were trapped inside the bay. This meant the British in New York did not know how strong de Grasse's fleet was until it was too late.
British Admiral George Brydges Rodney had been following de Grasse in the West Indies. He knew de Grasse had left, but not where he was going. Rodney thought de Grasse would send some of his fleet back to Europe. So, Rodney sent Rear Admiral Sir Samuel Hood with 14 warships. Hood was ordered to find de Grasse in North America. Rodney, who was sick, sailed to Europe with the rest of his fleet. He needed to recover, fix his ships, and avoid hurricane season.
Hood's fleet sailed more directly than de Grasse. He arrived off the Chesapeake entrance on August 25. He found no French ships there. So, he sailed for New York. Meanwhile, his friend, Rear Admiral Sir Thomas Graves, commanded the New York fleet. Graves had spent weeks trying to stop a convoy. This convoy was bringing much-needed supplies and money from France to Boston. When Hood arrived in New York, Graves was in port. He had failed to stop the convoy. Graves only had five warships ready for battle.
De Grasse had told his fellow admiral in Newport, Barras, his plans. Barras sailed from Newport on August 27. He had 8 warships, 4 smaller ships, and 18 transport ships. These carried French weapons and siege equipment. He took a long, roundabout way. This was to avoid fighting the British if they chased him from New York. Washington and Rochambeau had crossed the Hudson River on August 24. They left some troops behind. This was a trick to delay General Clinton from helping Cornwallis.
News of Barras's departure made the British realize. The Chesapeake was likely the French fleets' target. By August 31, Graves had moved his five warships out of New York harbor. He met with Hood's force. Graves took command of the combined fleet, now 19 ships. He sailed south. He arrived at the Chesapeake entrance on September 5. His progress was slow. Some ships from the West Indies were in poor condition. They needed repairs along the way. Graves was also worried about some of his own ships. The Europe had trouble moving.
Fleets Prepare for Battle
French and British scout ships spotted each other around 9:30 am. At first, both sides thought the other fleet was smaller. Each commander believed it was only Admiral de Barras's fleet. When they realized the true size, Graves thought de Grasse and Barras had already joined. He got ready for battle. He aimed his ships toward the bay's entrance. Winds from the north-northeast helped him.
De Grasse had sent some ships to block the York and James Rivers. These were farther up the bay. Many of his ships at anchor were missing officers, men, and boats. This was when the British fleet was seen. De Grasse faced a tough challenge. He had to form a battle line while sailing against the incoming tide. The winds and land features meant he had to sail in the opposite direction of the British fleet.
At 11:30 am, 24 French ships cut their anchor lines. They began sailing out of the bay with the noon tide. They left behind the shore teams and ships' boats. Some ships were very short on crew. They were missing as many as 200 men. This meant not all their cannons could be used. De Grasse ordered the ships to form a line as they left the bay. They were to line up by speed, not their usual order. Admiral Louis de Bougainville's Auguste was one of the first ships out. Bougainville and three other ships ended up far ahead of the rest of the French line. By 3:45 pm, the gap was so big that the British could have cut off his ships.

By 1:00 pm, the two fleets were generally facing each other. But they were sailing in opposite directions. To start the fight, and to avoid shallow areas near the bay's mouth, Graves gave an order around 2:00 pm. He told his whole fleet to turn around. This reversed his battle line. But it allowed his ships to line up with the French fleet as they left the bay. This put Hood's squadron, his most aggressive commander, at the back of the line. Admiral Francis Samuel Drake's squadron was at the front.
At this point, both fleets were sailing east, away from the bay. Winds came from the north-northeast. The two lines were coming together at an angle. This meant the leading ships at the front of both lines were close enough to shoot. But the ships at the back were too far apart to fight. The French had an advantage in firing. The wind allowed them to open their lower gun ports. The British had to keep theirs closed to stop water from coming in.
The French fleet was in better shape than the British. They had more ships and more cannons. Their cannons were also heavier. In the British fleet, the Ajax and Terrible were in very poor condition. These two ships were from the West Indies squadron. They were among the most heavily involved in the battle. Graves did not immediately attack the separated French front. As the French center and rear got closer to the British line, they also closed the distance with their own front. One British observer wrote that the French center was allowed to move forward without being bothered.
To get the lines parallel for a full fight, Graves gave confusing signals. Admiral Hood, leading the back squadron, understood them differently than Graves meant. None of the ways to close the angle between the lines looked good for the British. Any move to bring ships closer would limit their ability to fire. It could also expose their decks to enemy fire from end to end. Graves raised two flags: one for "line ahead" and one for "close action." "Line ahead" meant ships should slowly close the gap and then straighten the line. "Close action" usually meant ships should turn directly towards the enemy. This mix of signals caused his ships to enter the battle one by one. Admiral Hood thought keeping the "line of battle" was more important than "close action." Because of this, his squadron did not get close quickly. It was hardly involved in the battle.
The Battle Begins
It was about 4:00 pm, more than 6 hours after the fleets first saw each other. The British, who had the advantage of the wind, started their attack. The battle began with the Intrepid firing at the Marseillois. This was the ship at the front of the French line. The fighting quickly became widespread. The front and center of each line were fully engaged.
The French were known for aiming at British masts and rigging. Their goal was to make the enemy ships unable to move. This tactic worked well. The Shrewsbury and Intrepid, at the front of the British line, became almost impossible to control. They eventually fell out of the line. The rest of Admiral Drake's squadron also took heavy damage. But the casualties were not as bad as on the first two ships. The angle at which the British ships approached also caused damage. Ships at their front were hit from end to end. Only their front cannons could fire at the French.
The French front also took damage, but it was less severe. Captain de Boades of the Réfléchi was killed. This happened in the first shot from Admiral Drake's Princessa. The four ships at the French front were, according to a French observer, "fighting seven or eight vessels at close quarters." The Diadème was badly damaged. A French officer said it "was utterly unable to keep up the battle." It was saved by the timely help of the Saint-Esprit.
The Princessa and Bougainville's Auguste were once so close that the French admiral thought about boarding the British ship. Drake managed to pull away. But this gave Bougainville a chance to target the Terrible. Her front mast was already in bad shape before the battle. It was hit by several French cannonballs. Her pumps, which were already working hard to keep her afloat, were badly damaged. Shots hit "between wind and water" (below the waterline).
Around 5:00 pm, the wind started to change. This was bad for the British. De Grasse signaled for the front of his line to move further ahead. This would allow more French ships to join the fight. But Bougainville was fighting the British front at close range. He did not want to risk "severe handling had the French presented the stern." When he finally started to pull away, British leaders thought it was a retreat. They said, "the French van suffered most, because it was obliged to bear away." Instead of following, the British stayed back. They kept firing from a long distance. This made one French officer write that the British "only engaged from far off and simply in order to be able to say that they had fought." Sunset ended the firing. Both fleets continued sailing southeast, away from the bay.
The center of both lines was involved in the battle. But the damage and casualties there were much less. Ships in the back squadrons were almost completely uninvolved. Admiral Hood reported that only three of his ships fired a few shots. Graves's confusing signals continued. There were also differences between his and Hood's records of signals. This led to immediate arguments and a formal investigation later.
After the Battle
That evening, Graves checked his ships for damage. He saw that "the French had not the appearance of near so much damage as we had sustained." Five of his fleet were leaking or almost unable to move. De Grasse wrote that "we perceived by the sailing of the English that they had suffered greatly." Still, Graves kept his ships in a position where the wind was at his back. This would let him choose to fight the next morning. But ongoing repairs made it clear to Graves that he could not attack the next day.
On the night of September 6, he met with Hood and Drake. During this meeting, Hood and Graves argued about the confusing signals. Hood suggested turning the fleet around to go back to the Chesapeake. Graves refused this plan. The fleets continued to drift eastward, away from Cornwallis. On September 8 and 9, the French fleet sometimes had the wind advantage. They briefly threatened the British with another fight. French scouts saw Barras's fleet on September 9. De Grasse turned his fleet back toward the Chesapeake Bay that night. He arrived on September 12. He found that Barras had arrived two days earlier.
Graves ordered the Terrible to be sunk on September 11. It was leaking too much. On September 13, he was told the French fleet was back in the Chesapeake. He still did not know that de Grasse's line did not include Barras's fleet. The captain who reported it had not counted the ships. In a meeting that day, the British admirals decided not to attack the French. They said it was because of "the truly lamentable state we have brought ourself." Graves then turned his damaged fleet toward New York. He arrived off Sandy Hook on September 20.
What Happened Next
When the British fleet arrived in New York, it caused a lot of panic among the people loyal to Britain. The news of the defeat was also not well received in London. King George III wrote that "after the knowledge of the defeat of our fleet [...] I nearly think the empire ruined." He wrote this before he even knew Cornwallis had surrendered.
The French victory meant they firmly controlled the Chesapeake Bay. This completed the trap around Cornwallis. Besides capturing some smaller British ships, de Grasse and Barras used their smaller vessels. They helped transport Washington's and Rochambeau's forces from Head of Elk to Yorktown.
It was not until September 23 that Graves and Clinton learned the French fleet in the Chesapeake had 36 ships. This news came from a message Cornwallis sent on September 17. He also pleaded for help: "If you cannot relieve me very soon, you must be prepared to hear the worst." After fixing his ships in New York, Admiral Graves sailed from New York on October 19. He had 25 warships and transport ships carrying 7,000 soldiers to help Cornwallis. This was two days after Cornwallis surrendered at Yorktown.
General Washington told de Grasse how important his role was in the victory. He said, "You will have observed that, whatever efforts are made by the land armies, the navy must have the casting vote in the present contest." Cornwallis's surrender led to a peace treaty two years later. This treaty recognized the new, independent United States of America.
Admiral de Grasse returned with his fleet to the West Indies. In a major battle in 1782, he was defeated and captured by Rodney. This battle ended French and Spanish plans to capture Jamaica. His main ship, the Ville de Paris, was lost in a storm at sea. It was being taken back to England as part of a fleet led by Admiral Graves. Graves continued to serve, even with the arguments about his actions in this battle. He became a full admiral and received a special title in Ireland.
Remembering the Battle
At the Cape Henry Memorial in Virginia Beach, Virginia, there is a monument. It honors de Grasse and his sailors for their help in American independence. This memorial is part of the Colonial National Historical Park. The National Park Service takes care of it.
British Ships in the Battle
| British fleet | |||||||
|---|---|---|---|---|---|---|---|
| Ship | Type | Guns | Commander | Casualties | Notes | ||
| Killed | Wounded | Total | |||||
| Front (rear during the battle) | |||||||
| Alfred | Third rate | 74 | Captain William Bayne | 0 | 0 | 0 | |
| Belliqueux | Third rate | 64 | Captain James Brine | 0 | 0 | 0 | |
| Invincible | Third rate | 74 | Captain Charles Saxton | 0 | 0 | 0 | |
| Barfleur | Second rate | 98 | Rear Admiral Samuel Hood Captain Alexander Hood |
0 | 0 | 0 | |
| Monarch | Third rate | 74 | Captain Francis Reynolds | 0 | 0 | 0 | |
| Centaur | Third rate | 74 | Captain John Nicholson Inglefield | 0 | 0 | 0 | |
| Center | |||||||
| America | Third rate | 64 | Captain Samuel Thompson | 0 | 0 | 0 | |
| Bedford | Third rate | 74 | Captain Thomas Graves | 0 | 0 | 0 | |
| Resolution | Third rate | 74 | Captain Lord Robert Manners | 3 | 16 | 19 | |
| London | Second rate | 98 | Rear Admiral Thomas Graves Captain David Graves |
4 | 18 | 22 | Fleet flag |
| Royal Oak | Third rate | 74 | Captain John Plumer Ardesoif | 4 | 5 | 9 | |
| Montagu | Third rate | 74 | Captain George Bowen | 8 | 22 | 30 | |
| Europe | Third rate | 64 | Captain Smith Child | 9 | 18 | 27 | |
| Rear (front during the battle) | |||||||
| Terrible | Third rate | 74 | Captain William Clement Finch | 4 | 21 | 25 | Scuttled after the battle |
| Ajax | Third rate | 74 | Captain Nicholas Charrington | 7 | 16 | 23 | |
| Princessa | Third rate | 70 | Rear Admiral Francis Samuel Drake Captain Charles Knatchbull |
6 | 11 | 17 | Rear flag |
| Alcide | Third rate | 74 | Captain Charles Thompson | 2 | 18 | 20 | |
| Intrepid | Third rate | 64 | Captain Anthony James Pye Molloy | 21 | 35 | 56 | |
| Shrewsbury | Third rate | 74 | Captain Mark Robinson | 14 | 52 | 66 | |
| Total Casualties | 82 | 232 | 314 | ||||
| Unless otherwise cited, table information is from The Magazine of American History With Notes and Queries, Volume 7, p. 370. The names of the ship captains are from Allen, p. 321. | |||||||
French Ships in the Battle
French records do not list casualties for each ship. The French had about 209 casualties in total. Bougainville reported 10 killed and 58 wounded on his ship Auguste alone.
The exact order of the French ships as they left the bay is also not fully clear. Many observers wrote different sequences. Bougainville himself recorded several different arrangements.
| Admiral de Grasse's fleet | |||||||
|---|---|---|---|---|---|---|---|
| Division | Ship | Type | Commander | Casualties | Notes | ||
| Killed | Wounded | Total | |||||
| White and Blue Squadron (Front) | |||||||
| Pluton | 74 | Captain Albert de Rions | |||||
| Marseillois | 74 | Captain Castellane-Masjastre | First officer Champmartin wounded. | ||||
| Bourgogne | 74 | Captain Charritte | |||||
| Diadème | 74 | Captain de Monteclerc (WIA) | |||||
| Réfléchi | 64 | Captain Cillart de Surville | |||||
| Auguste | 80 | Captain Castellan (flag captain) | 10 | 58 | 68 | Front flag, Chef d'Escadre Bougainville | |
| Saint-Esprit | 80 | Captain Chabert-Cogolin (WIA) | |||||
| Caton | 64 | Captain Framond (WIA) | |||||
| White Squadron (Center) | |||||||
| César | 74 | Brigadier Coriolis d'Espinouse | |||||
| Destin | 74 | Captain Dumaitz de Goimpy | |||||
| Ville de Paris | 104 | Grasse (Lieutenant general) Vaugiraud de Rosnay (Major general) Cresp de Saint-Césaire (flag captain) |
Division, Squadron and Fleet flagship | ||||
| Victoire | 74 | Captain Albert de Saint-Hippolyte | |||||
| Sceptre | 74 | Captain Rigaud de Vaudreuil | |||||
| Northumberland | 74 | Captain Bricqueville | |||||
| Palmier | 74 | Captain Arros d'Argelos | |||||
| Solitaire | 64 | Captain Champion de Cicé | |||||
| Citoyen | 74 | Captain d'Ethy | |||||
| Blue Squadron (Rear) | |||||||
| Scipion | 74 | Captain de Clavel | |||||
| Magnanime | 74 | Captain Le Bègue de Germiny | |||||
| Hercule | 74 | Captain Turpin du Breuil | |||||
| Languedoc | 80 | Captain Parscau du Plessix | Rear flag, Chef d'Escadre de Monteil | ||||
| Zélé | 74 | Captain de Gras-Préville | |||||
| Hector | 74 | Captain Renaud d'Aleins | |||||
| Souverain | 74 | Captain Glandevès du Castellet | |||||
| Scouting and Signals | |||||||
| Signals and reconnaissance | Railleuse | Frigate | Captain Sainte-Eulalie | ||||
| Aigrette | Frigate | Traversay | |||||
The 74-gun Glorieux and Vaillant, along with other frigates, stayed at the mouths of the rivers they were guarding.
See also
 In Spanish: Batalla de la Bahía de Chesapeake para niños
