
Battle of the Saintes facts for kids
Quick facts for kids Battle of the Saintes |
|||||||
|---|---|---|---|---|---|---|---|
| Part of the American Revolutionary War | |||||||
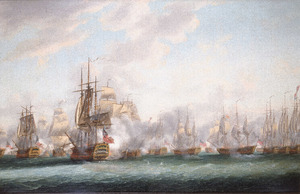
 The French flagship Ville de Paris in action against HMS Barfleur by Thomas Whitcombe |
|||||||
|
|||||||
| Belligerents | |||||||
| Commanders and leaders | |||||||
| Strength | |||||||
| 36 ships of the line | 30 ships of the line | ||||||
| Casualties and losses | |||||||
| 243 dead, 816 wounded |
4 ships of the line captured, 1 destroyed 3,000 dead or wounded, 5,000 captured |
||||||
The Battle of the Saintes, also called the Battle of Dominica, was a huge naval battle. It happened in the Caribbean Sea between the British and French navies. The fight took place from April 9 to 12, 1782. This British victory was their biggest win against the French during the American Revolutionary War.
The British fleet was led by Admiral Sir George Rodney. He defeated the French fleet, which was commanded by the Comte de Grasse. This British win stopped the French and Spanish from invading Jamaica. Jamaica was a very important British island at the time.
The battle is named after the Îles des Saintes. These are small islands located between Guadeloupe and Dominica in the West Indies. The year before, the French had helped the Americans win their revolution. But this battle stopped the French's winning streak. It also greatly affected the peace talks to end the war.
The French suffered many losses and had thousands of men captured. This included their commander, de Grasse. Four French warships, called ships of the line, were captured. One of these was the Ville de Paris, the French flagship. Another French ship was destroyed. Admiral Rodney is often given credit for using a new tactic called "breaking the line" in this battle. This tactic is still debated by historians.
Contents
Why the Battle Happened: The Background
In October 1781, French and Spanish leaders made a plan. Admiral Comte de Grasse, who led the French fleet, worked with Spanish officials. Their goals were to help the Americans, capture British islands, and take over Jamaica.
This plan was known as the "De Grasse–Saavedra Convention." The first goal was mostly met when the British army surrendered at Siege of Yorktown in September 1781. De Grasse and his fleet played a big part in that victory. After Yorktown, they returned to the Caribbean.
Jamaica was the biggest and most profitable British island in the Caribbean. It was very important because of its sugar production. Sugar made up 20% of all British imports. It was worth five times more than tobacco. The French and Spanish wanted to take Jamaica to hurt the British economy. They also wanted to push the British out of the West Indies.
While de Grasse waited for more ships and soldiers, he captured St. Kitts in February 1782. But Antigua, St. Lucia, and Barbados were still under British control. Admiral George Rodney arrived in the Caribbean the next month. He brought 17 more ships, giving the British a small advantage.
On April 7, 1782, de Grasse left Martinique with 35 warships. He also had over 100 cargo ships. He planned to meet a Spanish fleet and 15,000 troops in Saint-Domingue. These troops were meant to invade Jamaica. Rodney learned of this and sailed from St. Lucia to chase him.
The British ships had a special feature. Their hulls were covered in copper sheathing. This protected them from marine growth and made them much faster. This speed was a big advantage in good winds.
Who Was Fighting: Fleets and Commanders

The British flagship was HMS Formidable. Admiral Rodney commanded it. His second in command was Admiral Samuel Hood. The British fleet had 36 ships of the line. They had a total of 2,620 guns. Many British ships also had carronades. These were powerful, short-range cannons.
The French fleet had 34 ships of the line. Admiral de Grasse commanded them. His flagship was the huge 104-gun Ville de Paris. The French also had Spanish allies. The Spanish had 13 ships of the line and 24,000 soldiers. Their plan was to combine forces and attack Jamaica.
Rodney's job was to stop the French fleet from reaching the Spanish. He knew de Grasse's movements because of a lookout squadron. This squadron included fast frigates like HMS Agamemnon.
| Naval Commanders |
|---|
|


On April 8, the British learned the French fleet was leaving. Rodney's fleet quickly set sail to follow them. The French armada had 35 warships and over 100 smaller ships.
The British chased the French through the night. By morning on April 9, the French fleet was spread out. They were sailing between Dominica and Guadeloupe. At first, there was no wind, so neither fleet could move. When the wind finally picked up, only some British ships could move forward. De Grasse saw a chance to attack this smaller group.
The Battle Begins
On April 9, 1782, the fast British fleet caught up with the French. Admiral de Grasse ordered his cargo ships to head to Guadeloupe. He then arranged his warships in a line of battle to protect their retreat.
First Fights
Hood's section of the British fleet prepared for the first attack. The British waited for Rodney's signal to "engage the enemy." When the wind increased, more ships joined the fight. At this point, the French had more ships than the British. Captain William Bayne of the British ship Alfred was killed.
After some fighting, de Grasse realized more British ships were coming. He broke off the battle and moved his ships to the Saintes Islands. Rodney then rearranged his fleet. He put his undamaged ships at the front. This allowed Hood's ships to make repairs at the back.
On April 10, the French continued sailing away. Rodney thought they might turn to fight, but they didn't. By nightfall, they were 15 miles away.
On April 11, two French ships, Zélé and Magnanime, had accidentally crashed. They fell behind the main French fleet. Rodney decided to attack them. This made de Grasse turn back to protect his ships. But no actual fighting happened that day.
The Main Fight: April 12
On April 12, the French ships were not in a proper formation. The damaged French ship Zélé had crashed again. It was being towed to Guadeloupe. Four British ships chased them. De Grasse turned his fleet to protect Zélé. Rodney then called back his chasing ships and ordered his fleet into a line of battle.
Rear Admiral Drake's division led the British attack. At 7:40 AM, HMS Marlborough opened fire on the French. The British ships sailed past the French line, firing their cannons. This was a typical naval battle tactic of the time.
The Initial Attack

As the battle continued, the winds became unpredictable. This allowed Rodney's flagship, Formidable, and other British ships to sail towards the French line.
At 8:00 AM, Formidable signaled Marlborough to open fire. Marlborough fired its full broadside at the French ship Dauphin Royal. British ships passed the French line one by one, firing their cannons. HMS Arrogant fired three broadsides for every one from the French.
Admiral Drake on HMS Princessa led the first 12 British ships. Then came Rodney's squadron. It took Formidable almost an hour to reach the center of the battle. The smoke from the cannons was so thick it was like a dense fog. Formidable entered the smoke and approached de Grasse's flagship, Ville de Paris, at 8:40 AM.
The ships kept moving, so new enemies faced each other every few minutes. Formidable then faced other French ships like Couronne and Sceptre.
Breaking the Line

Within an hour, the wind changed direction. This forced the French line to break apart. The British could now fire their guns from both sides of their ships. This was a huge advantage, especially with their new carronades. These short-range cannons reloaded faster. The French ship Glorieux was badly damaged and dismasted.
In the confusion, four French ships, including Diadem, broke out of their line. Formidable turned and sailed right through a gap in the French line. Five other British ships followed. This move, called "breaking the line," was new and risky. It allowed the British to fire on both sides of the French ships. Many French gunners left their posts in fear.
Diadem left the battle. Formidable was followed by Namur and St Albans. Then came the powerful Canada, Repulse, and Ajax. Each of these ships fired more shots at the crippled Glorieux.
At the same time, Commodore Edmund Affleck on Bedford accidentally sailed through the French line. He realized his mistake when he saw no enemy ships on his starboard side.

Bedford was followed by Hood's squadron. This broke the French line into three parts. The French ships César and Hector were badly damaged. By 11:00 AM, the British ship Royal Oak delivered a final blow to César. Both fleets then drifted apart as the wind died down.
Around noon, both fleets saw sharks in the water. The sharks were attracted by the noise and blood. French ships had many soldiers packed on their lower decks. This led to very high casualties. To reduce confusion, the French threw dead (and possibly dying) men overboard. This provided a feast for the sharks.
French Retreat
The French fleet was now downwind from the British. They had no choice but to try and escape. At 1:00 PM, the French frigate Richemont tried to tow the badly damaged Glorieux. But the British ships blocked them.
The captain of Glorieux was dead. The remaining officer had to surrender. Royal Oak captured the ship. Meanwhile, the British ships restocked their gunpowder.
Around 1:30 PM, Centaur and Bedford attacked the damaged César. Its captain, Bernard de Marigny, refused to surrender and was badly wounded.
With their formation broken and many ships damaged, the French fled southwest. Rodney tried to regroup his ships before chasing them. By 2:00 PM, the wind picked up, and the chase began. The British captured the French ship Ardent. They then caught up with the French rear at 3:00 PM. Admiral de Grasse signaled for other ships to protect Ville de Paris, but only a few responded.
The British fleet closed in. Rodney's ships isolated the remaining French ships. César was dismasted and on fire. Centaur captured it. Soon after 5:00 PM, Hector was also dismasted and captured by Alcide.
At 5:30 PM, de Grasse's Ville de Paris was almost alone. Barfleur and Formidable were close behind. Five French ships tried to protect her, but they were not in formation. De Grasse tried to signal his fleet to form a line, but it was too late. Most of the French fleet had already retreated.
End of the Battle
Canada swept past Ville de Paris, damaging its masts. HMS Russell then fired a broadside that ripped through the entire length of the French flagship. Russell then moved to block its escape, while Barfleur attacked from the other side.
Ville de Paris was in terrible condition. All its masts were damaged, and its rudder was shot away. Over 300 men were dead or injured. Around 6:00 PM, overwhelmed, Ville de Paris finally struck her colors, signaling surrender. Hood approached to receive the surrender.
The British crew who boarded the ship were shocked by the terrible scene. Admiral de Grasse was unharmed, but almost all his officers were killed or wounded. Rodney soon boarded and Hood presented de Grasse to him. With de Grasse's surrender, the battle was effectively over. The remaining French ships retreated in disorder.
Later that night, around 9:00 PM, a fire started on the captured César. It was caused by French crew members who had broken into the liquor stores. By 10:30 PM, the ship's magazine exploded. More than 400 French and 58 British sailors died. Many men jumped overboard but were attacked by sharks.
-
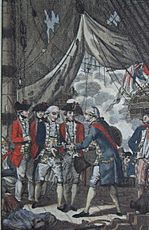
A 1785 engraving of de Grasse surrendering to Rodney.
-
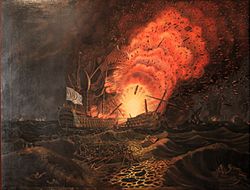
The End of the César by François Aimé Louis Dumoulin
-
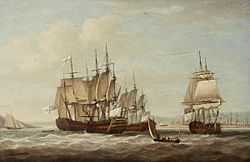
Captured French ships after the battle by Dominic Serres
.jpg)


Battle Losses
The British lost 243 men killed and 816 wounded. Two British captains were killed. No British ships were lost. The French had much higher casualties. Estimates range from 3,000 to 6,000 killed or wounded. Around 5,000 to 6,000 French soldiers and sailors were captured.
Six French captains were killed. Four French ships of the line were captured, and one was destroyed. The Ville de Paris alone had over 400 killed and 700 wounded. This was more than the casualties of the entire British fleet. De Grasse was the first French admiral ever captured by an enemy. He was sent to England.
What Happened Next: Aftermath

Some people criticized Rodney for not chasing the remaining French ships. Samuel Hood believed that 20 more French ships could have been captured.
On April 17, Hood was sent to pursue the French. He quickly captured two more French ships and two smaller warships. This happened in the Battle of the Mona Passage on April 19. After this, Hood met Rodney in Port Royal. The British fleet needed nine weeks to repair the damage from the battle.
The remaining French fleet reached Cap-François in waves. The main group arrived on April 25. By May, all 26 French ships from the battle had arrived. They were joined by 12 Spanish ships. However, disease spread among the French forces. Thousands of soldiers died. The French and Spanish then decided to give up their plans to attack Jamaica. Instead, they focused on protecting their own territories. Jamaica remained a British colony.
Months later, disaster struck the British. Admiral Graves was leading a fleet back to England. This fleet included the captured French ships. In September, they ran into a huge hurricane off Newfoundland. Glorieux, Hector, and Ville de Paris sank with many lives lost.
Reactions to the Battle
News of the defeat reached France in June. It was met with great sadness. The loss of the Ville de Paris was a huge blow to French King Louis XVI. The navy minister called it "a grim disaster." All blame fell on Comte de Grasse. He tried to clear his name, but an angry Louis told him to retire.
The battle also had a big impact on France's money. The financial loss was huge. The Ville de Paris alone had 36 chests of money worth at least £500,000. This money was for the troops. France had lost very few warships in the first four years of the war. But in 1782, they lost 15 ships of the line. The French finance minister had to add a new tax to pay for more ships.
In Britain, there was widespread celebration. People were incredibly joyful. Rodney was celebrated as a hero when he returned. Many cartoons and paintings were made to honor his victory. He personally presented Comte de Grasse to King George III as a prisoner. Rodney was made a peer (a noble) and given £2,000 a year. Hood was also made a peer, and Drake and Affleck became baronets.
Impact on Peace Talks

Peace talks had already started in Paris in early 1782. These talks involved Britain, the American colonies, France, and Spain. The Battle of the Saintes greatly affected these talks when the news arrived in June. The British victory shifted the power back to them. Their control of the sea was re-established.
The Americans learned of the French defeat. They realized they might not get much French support in the future. American negotiators became more willing to compromise. They dropped some of their demands. They also agreed to make a separate peace treaty without the French. This victory showed a weakening of the alliance between France and America. However, the battle did not change the final outcome of the American Revolution.
France was running out of money. The French foreign minister, Vergennes, desperately wanted peace. France had also promised Spain they wouldn't make peace until Spain captured Gibraltar. But Spain's attempt to take Gibraltar failed in October. So, Vergennes demanded that Spain give up its claim on Gibraltar to make peace. Spain agreed.
Comte de Grasse, as a high-profile prisoner, was used to send peace messages between Britain and France. A preliminary peace treaty between Britain and the United States was signed on November 30, 1782. With the Americans separated from their allies, peace was signed with France and Spain in January 1783. The final treaty was signed in September 1783. Because of their military successes in 1782, the peace treaties were better for Britain than expected.
The British won because of their excellent seamanship and gunnery. This battle is considered the greatest British naval victory over the French during the American Revolutionary War.
The battle is famous for the British tactic of "breaking the line." This is when British ships sailed through a gap in the French line. This allowed them to attack the enemy from both sides, causing great confusion. Some historians debate if this tactic was planned or happened by chance. They also debate who should get credit for it.
After this battle, British naval tactics changed. The old method was to spread ships along the entire enemy line. In the next five major naval battles involving the Royal Navy, the British won all of them. They did this by creating a stronger force in one specific area of the enemy line.
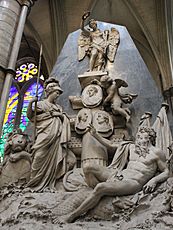
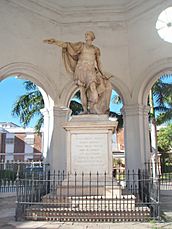
Monuments to the Battle
A large, fancy monument was built in Westminster Abbey. It honors the three British captains who died in the battle: William Blair, William Bayne, and Robert Manners. The marble monument is 25 feet tall. It was finished in 1793. It shows a figure of Fame, with portraits of the captains. Below are figures of Britannia and a lion, facing Neptune and a sea horse.
A monument was also built in Spanish Town, Jamaica. It honors Admiral Rodney's role in the battle. It was created in 1801. Two of the guns from the captured Ville de Paris stand next to Rodney's statue.
-
The Three Captains monument, Westminster Abbey
-

Detail of the Three Captains monument, Westminster Abbey
-
Rodney monument in Spanish Town, Jamaica


Order of Battle
Britain
| Van | ||||||||
|---|---|---|---|---|---|---|---|---|
| Ship | Rate | Guns | Commander | Casualties | Notes | |||
| Killed | Wounded | Total | ||||||
| HMS Royal Oak | Third rate | 74 | Captain Thomas Burnett |
|
|
|
||
| HMS Alfred | Third rate | 74 | Captain William Bayne † |
|
|
|
Bayne killed on 9 April | |
| HMS Montagu | Third rate | 74 | Captain George Bowen |
|
|
|
||
| HMS Yarmouth | Third rate | 64 | Captain Anthony Parrey |
|
|
|
||
| HMS Valiant | Third rate | 74 | Captain Samuel Granston Goodall |
|
|
|
||
| HMS Barfleur | Second rate | 98 | Rear Admiral Sir Samuel Hood Captain John Knight |
|
|
|
Flagship of van | |
| HMS Monarch | Third rate | 74 | Captain Francis Reynolds |
|
|
|
||
| HMS Warrior | Third rate | 74 | Captain Sir James Wallace |
|
|
|
||
| HMS Belliqueux | Third rate | 64 | Captain Andrew Sutherland |
|
|
|
||
| HMS Centaur | Third rate | 74 | Captain John Nicholson Inglefield |
|
|
|
No casualty returns made | |
| HMS Magnificent | Third rate | 74 | Captain Robert Linzee |
|
|
|
||
| HMS Prince William | Third rate | 64 | Captain George Wilkinson |
|
|
|
||
| Centre | ||||||||
| HMS Bedford | Third rate | 74 | Commodore Edmund Affleck Captain Thomas Graves |
|
|
|
||
| HMS Ajax | Third rate | 74 | Captain Nicholas Charrington |
|
|
|
||
| HMS Repulse | Third rate | 64 | Captain Thomas Dumaresq |
|
|
|
||
| HMS Canada | Third rate | 74 | Captain William Cornwallis |
|
|
|
||
| HMS St Albans | Third rate | 64 | Captain Charles Inglis |
|
|
|
||
| HMS Namur | Second rate | 90 | Captain Robert Fanshawe |
|
|
|
||
| HMS Formidable | Second rate | 98 | Admiral Sir George Rodney Captain Sir Charles Douglas (first captain) Captain John Symons (second captain) |
|
|
|
Flagship of centre | |
| HMS Duke | Second rate | 98 | Captain Alan Gardner |
|
|
|
||
| HMS Agamemnon | Third rate | 64 | Captain Benjamin Caldwell |
|
|
|
||
| HMS Resolution | Third rate | 74 | Captain Lord Robert Manners |
|
|
|
||
| HMS Prothee | Third rate | 64 | Captain Charles Buckner |
|
|
|
||
| HMS Hercules | Third rate | 74 | Captain Henry Savage |
|
|
|
Captain Savage wounded | |
| HMS America | Third rate | 64 | Captain Samuel Thompson |
|
|
|
||
| Rear | ||||||||
| HMS Russell | Third rate | 74 | Captain James Saumarez |
|
|
|
||
| HMS Fame | Third rate | 74 | Captain Robert Barbor |
|
|
|
||
| HMS Anson | Third rate | 64 | Captain William Blair † |
|
|
|
||
| HMS Torbay | Third rate | 74 | Captain John Lewis Gidoin |
|
|
|
||
| HMS Prince George | Second rate | 98 | Captain James Williams |
|
|
|
||
| HMS Princessa | Third rate | 70 | Rear Admiral Francis Samuel Drake Captain Charles Knatchbull |
|
|
|
Flagship of rear | |
| HMS Conqueror | Third rate | 74 | Captain George Balfour |
|
|
|
||
| HMS Nonsuch | Third rate | 64 | Captain William Truscott |
|
|
|
||
| HMS Alcide | Third rate | 74 | Captain Charles Thompson |
|
|
|
No casualty returns made | |
| HMS Arrogant | Third rate | 74 | Captain Samuel Pitchford Cornish |
|
|
|
||
| HMS Marlborough | Third rate | 74 | Captain Taylor Penny |
|
|
|
||
| Not in line | ||||||||
| HMS Endymion | Fifth rate | 44 | Captain Edward Smith | |||||
| HMS Flora | Fifth rate | 36 | Captain Samuel Marshall | |||||
| HMS Alarm | Fifth rate | 32 | Captain Charles Cotton | |||||
| HMS Andromache | Fifth rate | 32 | Captain George Anson Byron | |||||
| HMS Sibyl | Sixth rate | 28 | Captain John Rodney | |||||
| HMS Triton | Sixth rate | 28 | Captain John M'Lawrin | |||||
| HMS Champion | Sixth rate | 24 | Captain Alexander Hood | |||||
| HMS Eurydice | Sixth rate | 24 | Captain George Wilson | |||||
| HMS Alert | Cutter | 14 | Commander James Vashon | |||||
| Total recorded casualties: 239 killed, 762 wounded (casualties for two ships unknown) | ||||||||
France
| Division | Ship | Guns | Commander | Casualties | Notes | ||
|---|---|---|---|---|---|---|---|
| Killed | Wounded | Total | |||||
| Escadre bleue (Chef d'Escadre de Bougainville) | |||||||
| 3rd Division |
Hercule | 74 | Chadeau de la Clocheterie † | First officer Poulpiquet de Coatlès assumed command | |||
| Neptune | 74 | Renaud d'Aleins | |||||
| Souverain | 74 | Glandevès du Castellet | |||||
| Palmier | 74 | Martelly-Chautard | |||||
| 1st Division |
Northumberland | 74 | Cresp de Saint-Césaire † | First officer Le Saige de La Mettrie killed. Ensign Gombaud de Roquebrune assumed command. | |||
| Auguste | 80 | Bougainville (Chef d'escadre) Castellan (flag captain) |
|||||
| Ardent | 64 | Gouzillon (WIA) | Captured | ||||
| 2nd Division |
Scipion | 74 | Clavel | ||||
| Brave | 74 | Renart d'Amblimont | |||||
| Citoyen | 74 | Thy (WIA) | |||||
| Escadre blanche (Lieutenant-Général de Grasse) | |||||||
| 3rd Division |
Hector | 74 | Chauchouart de Lavicomté † | Captured. First officer de Beaumanoir assumed command. | |||
| César | 74 | Bernard de Marigny † | Captured but destroyed. First officer Laub assumed command. | ||||
| Dauphin Royal | 70 | Roquefeuil-Montpéroux | |||||
| 1st Division |
Languedoc | 80 | Arros d'Argelos | ||||
| Ville de Paris | 104 | Grasse (Lieutenant général) Vaugiraud (Major general) (WIA) Lavilléon (flag captain) |
Captured | ||||
| Couronne | 74 | Mithon de Genouilly | |||||
| 2nd Division |
Éveillé | 64 | Le Gardeur de Tilly | ||||
| Sceptre | 74 | Louis de Rigaud de Vaudreuil | Malet de Puyvallier served aboard. | ||||
| Glorieux | 74 | Pérusse des Cars † | Captured. Lieutenant Trogoff de Kerlessy assumed command. | ||||
| Escadre blanche et bleue (Chef d'Escadre d'Espinouse) | |||||||
| 3rd Division |
Diadème | 74 | Monteclerc | ||||
| Destin | 74 | Dumaitz de Goimpy | |||||
| Magnanime | 74 | Le Bègue de Germiny (WIA) | |||||
| Réfléchi | 64 | Médine | |||||
| 1st Division |
Conquérant | 74 | La Grandière | ||||
| Magnifique | 74 | Macarty Macteigue | |||||
| Triomphant | 80 | Marquis de Vaudreuil (chef d'escadre) Cheyron du Pavillon (flag captain) (DOW) |
|||||
| Bourgogne | 74 | Charitte | |||||
| 2nd Division |
Duc de Bourgogne | 80 | Champmartin (flag captain) (WIA) Coriolis d'Espinouse (chef d'escadre) |
||||
| Marseillais | 74 | Castellane Majastre | |||||
| Pluton | 74 | Albert de Rions | |||||
Not in line: Frigates Richemont (Mortemart); Amazone (Ensign Bourgarel de Martignan, acting captain replacing Montguyot); Aimable (Lieutenant de Suzannet); Galathée (Lieutenant de Roquart); corvette Cérès (Lieutenant de Paroy); and cutter Clairvoyant (Ensign de Daché); cutter Pandour (Grasse-Limermont).
